How to remove macOS Sonoma beta
Macworld
?
If you are a programmer or simply interested in experiencing the upcoming macOS version, you may have been testing the beta version of macOS Sonoma on your Mac. But what steps should you take if you no longer wish to continue using the beta version?
If the beta version is causing disruption on your Mac, you may be tired of needing to dedicate hours each week for the latest update installation, or you may prefer to stick with the current stable version instead of risking issues with the next update. If so, continue reading.
We will go over the basic instructions for changing back to the complete version of Ventura from the macOS Ventura beta, followed by the slightly more involved process of changing back from the macOS Sonoma beta to macOS Ventura.
.
If you want to exit the iOS beta program, follow these steps: How to uninstall an iOS beta from your iPhone.
How can I stop receiving the macOS beta update?
If you are currently using the beta version of macOS Sonoma and wish to upgrade to the latest version, the steps to switch back to the complete version are straightforward.
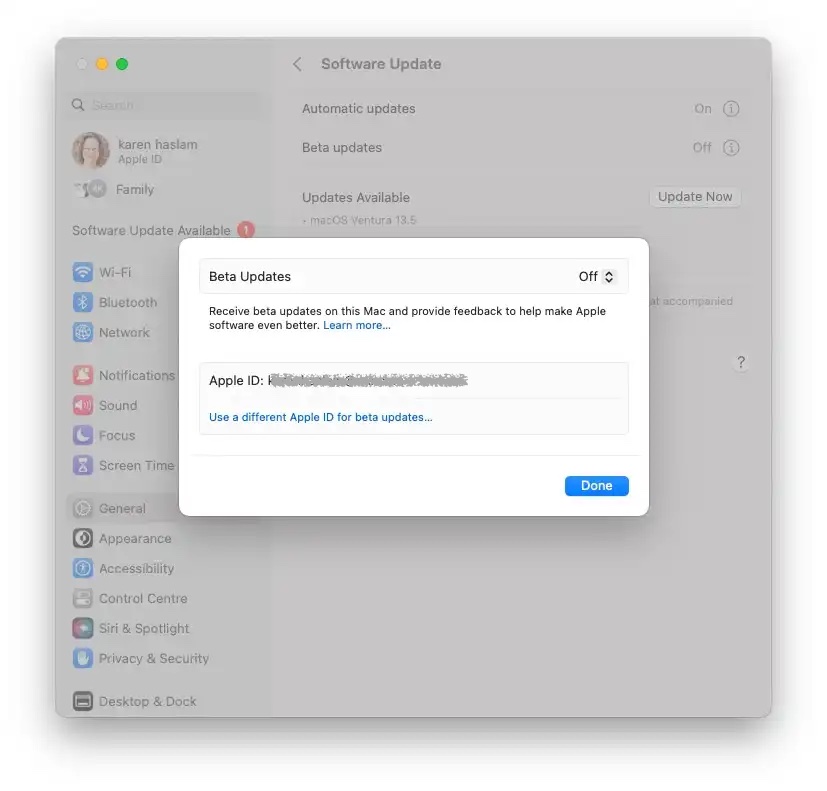
To remove yourself from Apple’s macOS beta program and prevent beta updates from being received on your Mac, the initial step is to do the following:
- Open System Settings.
- Click on General.
-
Select the option for Software Update.
-
Select the “i” next to Beta updates and ensure that it is switched off.
After exiting the Beta program, the upcoming version of macOS will be available through System Settings as a complete version. You can install it normally.
If you are using a newer version of the beta that is not yet official, the process becomes a bit more complex. In this situation, you can either wait for Apple to release the next macOS Sonoma update and install it, or follow the instructions below to restore an older version of macOS.
If you prefer not to wait for the upcoming update, you can install macOS Sonoma using macOS Recovery.
-
To access Recovery mode, hold down the power button while starting up your Mac. Keep holding the button until a startup options window appears with an Options icon. (For older Macs, press Command and R during start-up to enter Recovery).
-
Choose Options and press Proceed.
-
Open the macOS Utilities menu and choose the Reinstall macOS [version] option to proceed.
-
Please provide your password if prompted.
-
Please wait for the installation to finish (keep the Mac from going into sleep mode).
If you plan on erasing your disk, it’s important to have backups of any crucial documents. However, do not use Time Machine as it will also save a copy of your current macOS version.
If this is not effective for you, or if you wish to switch back to Sonoma when Apple begins work on the next macOS beta in the summer of 2024, then the alternative is to erase your Mac and perform a fresh installation by following the instructions provided below.
Additional guidance for installing macOS on your Mac can be found in these resources. In case you encounter any difficulties during the installation process, here are some steps to follow.
How to reinstall the macOS operating system once the beta version has been installed.
If you are using a beta version of macOS 15 upon its release, or if you are unable to switch back to the final release of macOS Sonoma from the beta using the instructions provided, you may want to consider the following option.
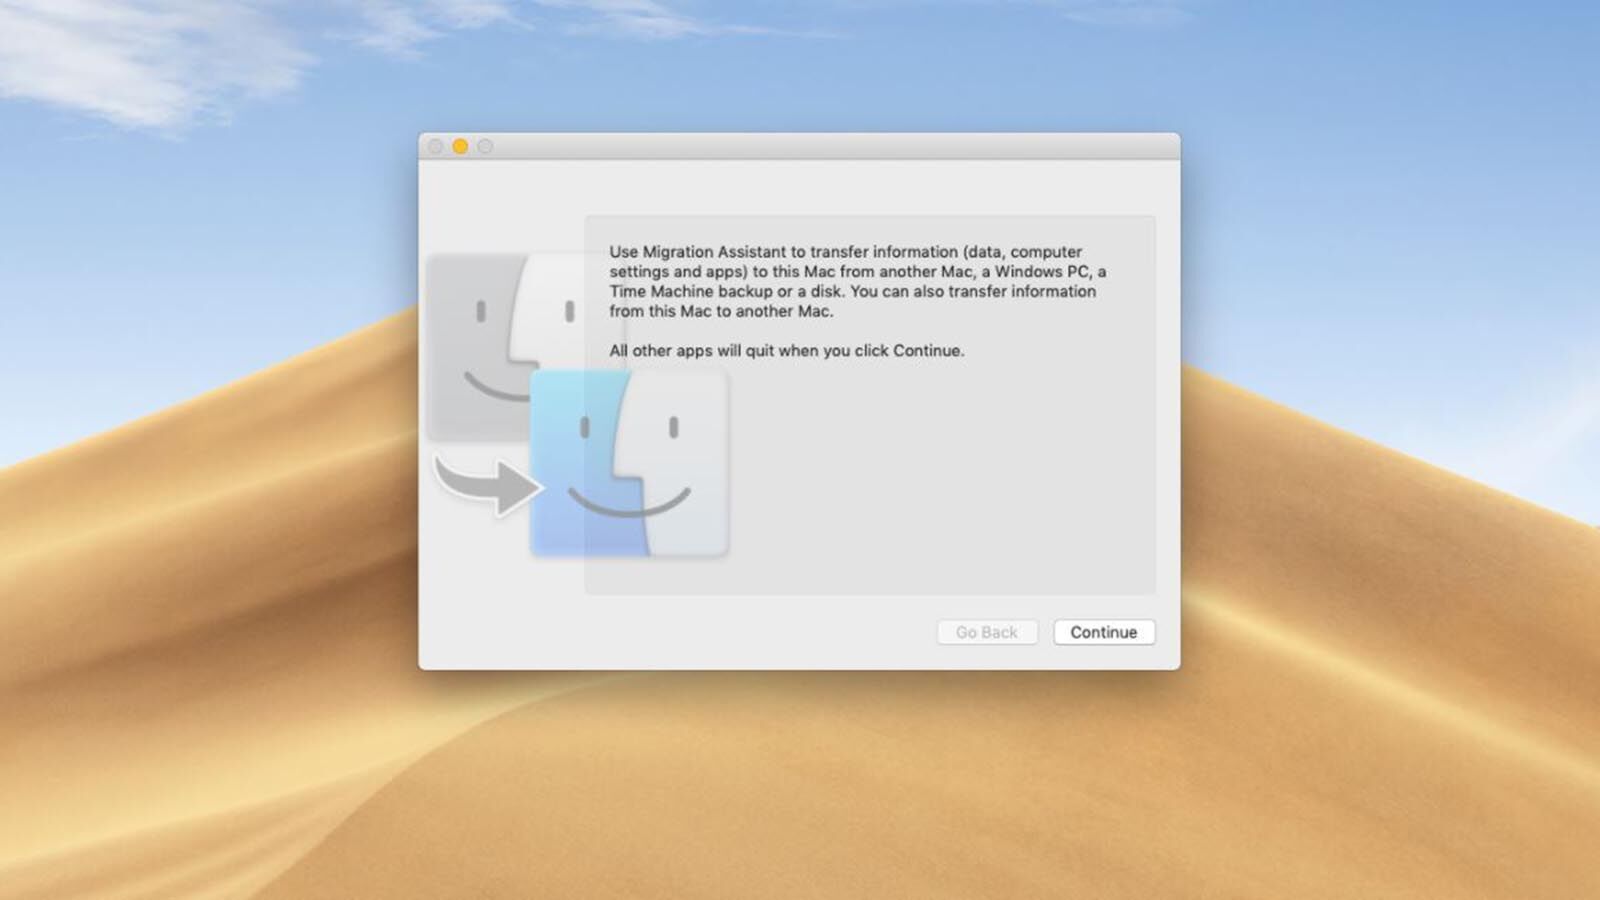
If you wish to revert to a previous macOS version after using the beta (such as reverting from Sonoma beta to Ventura, as shown in the example below), you must first erase your Mac. Unfortunately, it is not possible to install Ventura over Sonoma. This is why we advise creating a backup before installing a beta or any newer macOS version.
Exit the beta program
Foundry
To stop receiving beta updates on your Mac, the initial step is to withdraw from Apple’s macOS Sonoma beta program.
- Open System Settings.
- Click on General.
-
Select “Software Update” from the options.
-
Select the “i” next to Beta updates and ensure that it is turned off.
This will stop any further Sonoma updates being installed on your Mac, but if you want to revert back to Ventura you will need to wipe your Mac, as per the instructions below.
Wipe your Mac

Foundry
Regrettably, if you are transitioning from macOS Sonoma to Ventura, you will have to wipe the data from your Mac beforehand. Installing Ventura over Sonoma is not possible.
Fortuitously, there exists a “Erase All Content and Settings” choice in the System Settings, which simplifies the process of restoring your Mac to its original factory settings.
To access the Erase All Content and Settings option, navigate to System Settings > General > click on Reset > then choose the Erase All Contents and Settings option.
After clicking on Erase All Content and Settings, all tasks will be completed. Further instructions on how to factory reset a MacBook or Mac can be found here.
Please be aware that while going through this process, any Bluetooth keyboards or mice will be disconnected. If you have wired options available, they will come in handy. If you do not have a wired mouse or keyboard, you will be prompted to connect your Bluetooth devices when the Mac restarts.
If your Mac does not have an M-series chip or a T2 chip, the method for erasing it is slightly different (and explained in the article linked above).
Reinstall macOS

Foundry
After your Mac has been erased and restored to its original settings, it will reboot with the most recent complete version of macOS that is suitable for your Mac.
To use your mouse and keyboard, connect them via Bluetooth and join your Wi-Fi network.
Eventually, you will come across an Activate Mac screen. Press the Restart button.
After restarting, your Mac will walk you through the setup process as if it were brand new.
Restore your Mac using Time Machine.
Foundry
Once you have deleted your content and settings from your Mac, you have the option to either start fresh or restore a Time Machine backup containing all your data from before your beta experience.
Please ensure that this backup was made before installing the beta, otherwise you will simply reinstall the beta.
If you have erased your Mac and are configuring it as a new device, retrieving your previous configurations and data through a Time Machine backup is a simple process.
-
During the setup, you will be prompted to confirm if you have a Time Machine backup. Simply answer in the affirmative.
-
Insert your backup device and allow the Mac to retrieve the information from the Time Machine backup.
-
After completing this process, your Mac will revert back to its previous state before the beta installation.
If you choose to retrieve your Time Machine backup at a later time, you can access it through macOS Recovery.
-
Connect the hard drive that contains your Time Machine backup.
- Restart your Mac.
-
If you are using an M1-Series Mac, you will need to press and hold the power button until the Loading startup options screen appears. From there, click on Options and then select Continue. For instructions on starting a Mac in Recovery mode, refer to How to start a Mac in Recovery mode. (On an Intel-powered Mac, press and hold Command + R until the Apple logo appears.)
-
Once you have accessed macOS Recovery, the option to Restore from your Time Machine Backup will be available. Choose that and click on Continue.
-
Select your Backup source and then click on Continue once more.
-
Select the appropriate backup, which should be the most recent one before installing the beta. (You can confirm this by viewing the macOS version column).
We offer a manual for recovering data from Time Machine available here.
If you are having trouble downloading Ventura on your Mac, here are some steps you can try to resolve the issue:
1. Check your internet connection and make sure it is stable.
2. Restart your Mac and try downloading Ventura again.
3. Clear your browser’s cache and cookies.
4. Disable any antivirus or firewall software that may be blocking the download.
5. Try downloading Ventura using a different web browser.
If your Mac is unable to download Ventura, follow these steps to troubleshoot the problem:
1. Ensure that your internet connection is stable.
2. Restart your Mac and attempt to download Ventura again.
3. Clear your browser’s cache and cookies.
4. Temporarily disable any antivirus or firewall software that may be preventing the download.
5. Attempt to download Ventura using a different web browser.
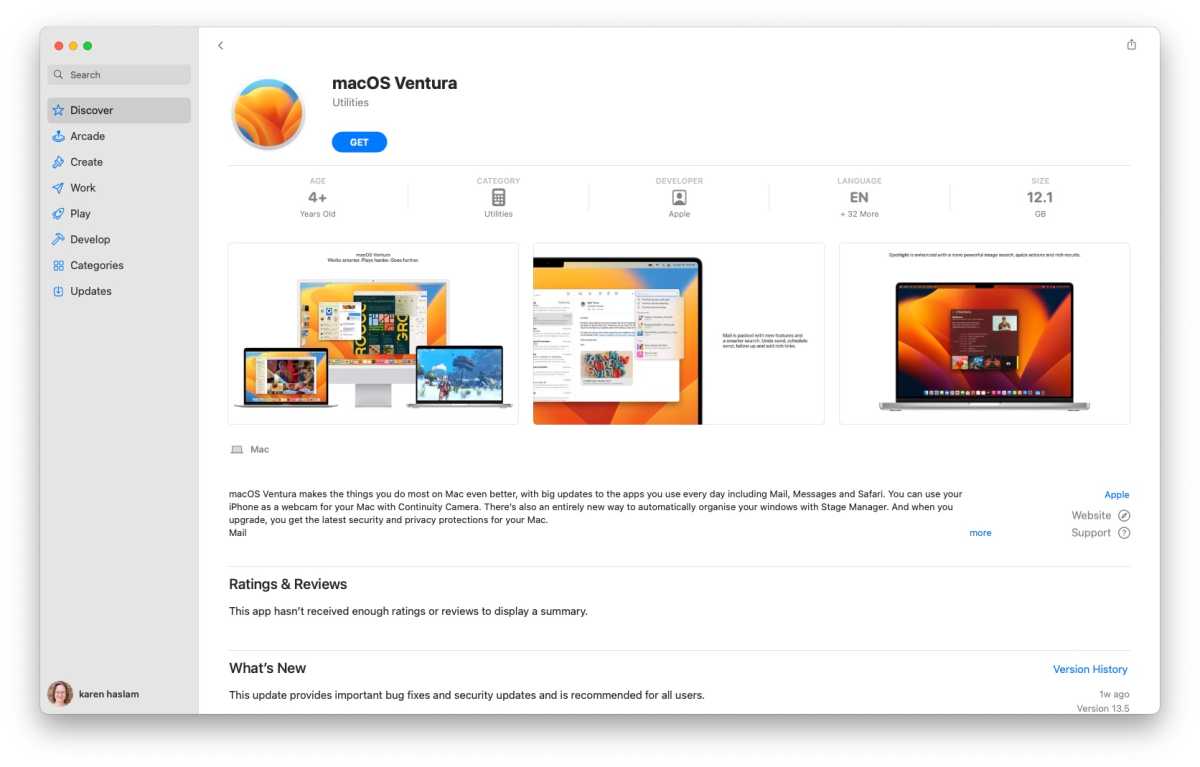
Foundry
If Ventura is not accessible for download through Software Update, possibly due to your Mac incorrectly detecting that it is already installed, you can bypass this by using the Mac App Store to download and install the complete version of the software.
-
Access the Mac App Store.
-
To access Ventura, click the first link, for Monterey click the second link, for Big Sur click the third link, or for Catalina click the fourth link.
-
Select “Get” and your Mac will prompt you to download the installation files.
-
Open the Software Update window by navigating to System Settings or System Preferences. Give confirmation to proceed with the software download and disregard any warning about downloading a previous version of the operating system.
-
Please be patient as the macOS downloads; it may take some time. If your internet connection is interrupted, you may need to restart the download.
-
After downloading, click on “Open” and wait for the installation process to complete. This may take some time.
You may receive a notification indicating that the software has already been installed. Simply confirm your intention to proceed with the download and once you have the installer, you can install the final version over the beta.
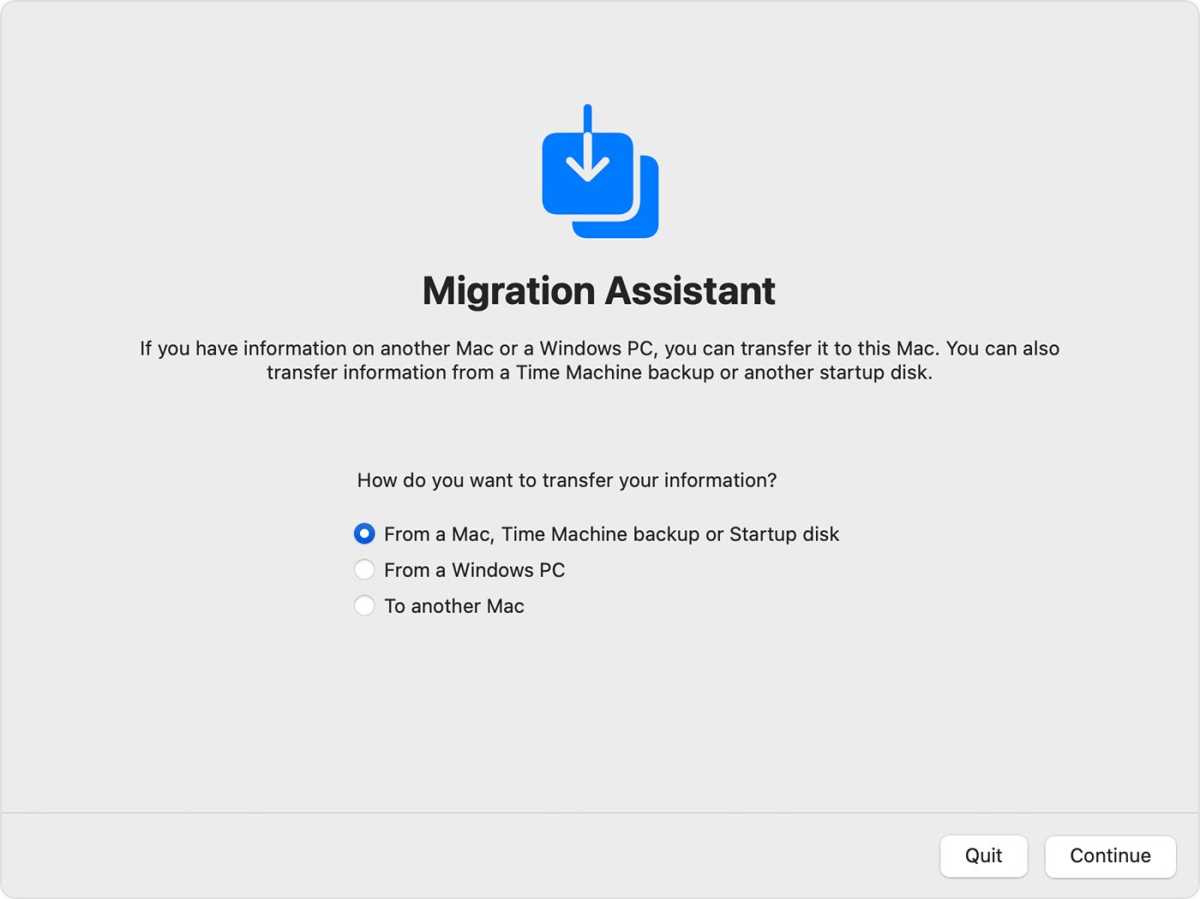
How to go back to a previous version of macOS using the Recovery method.
It is also feasible to acquire and set up a previous operating system through the included Recovery mode. However, this is contingent on the specific version you are reverting to. We will guide you through the steps in our article: How to reinstall macOS using Recovery Mode.
To perform a reinstallation of the latest compatible version of macOS on your Mac using Recovery, follow these steps:
- Restart your Mac.
-
To access the startup options screen on an M1/M2-Series Mac, press and hold the power button until it appears. Then, click on “Options” and select “Continue.” On an Intel-powered Mac, press and hold down Option + Command + R until the Apple logo appears. For more information on starting a Mac in Recovery mode, refer to the guide.
-
Select the “Reinstall macOS” option and Recovery will install the latest compatible version of macOS on your Mac.
If you prefer not to return to Ventura, you can reinstall the original version of macOS that was on your Mac when you bought it by pressing Shift + Option + Command + R (on an Intel Mac).